Overview
Blocks let you embed custom content directly within Rippling, with support for real-time, dynamic data. You can think of a block as a lightweight custom app that runs inside other areas of Rippling. Currently, blocks can be embedded within employee profile pages and custom object pages.
When a user updates data inside a block (such as editing a field or clicking a submit button), the block can trigger an API call or update a custom object. That update immediately reflects everywhere the custom object is referenced, including custom apps, profile tabs, or automated workflows.
Blocks can receive input from the page they’re embedded in AND allow users to update data directly.
In this guide, you’ll learn how to:
- Pass context from a parent page into a block.
- Call an API function using that context.
- Render or update dynamic data inside the UI.
Requirements
- Permission to create custom apps
- API token - Required if calling the Rippling APIs. Generate your token in the Developer app under the API Tokens tab, and save it for later use.
- A deployed Rippling function - This will contain the logic that dynamically populates data in your block.
Display data
Here’s an example of the high-level flow to display dynamic data using Block Manager:

Create a new block
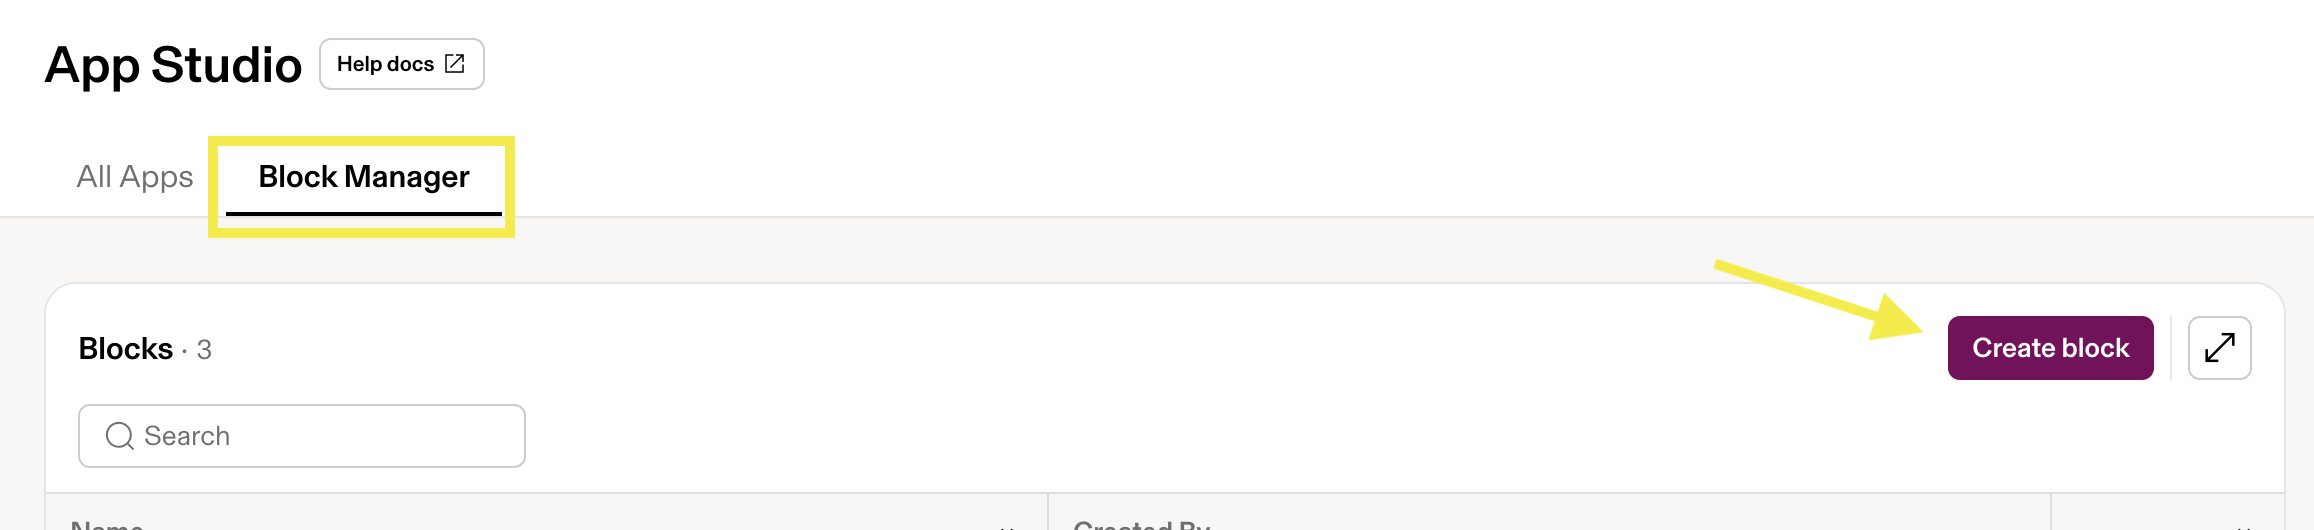
- From the sidebar, select Tools > App Studio.
- Select Block Manager > Create block.
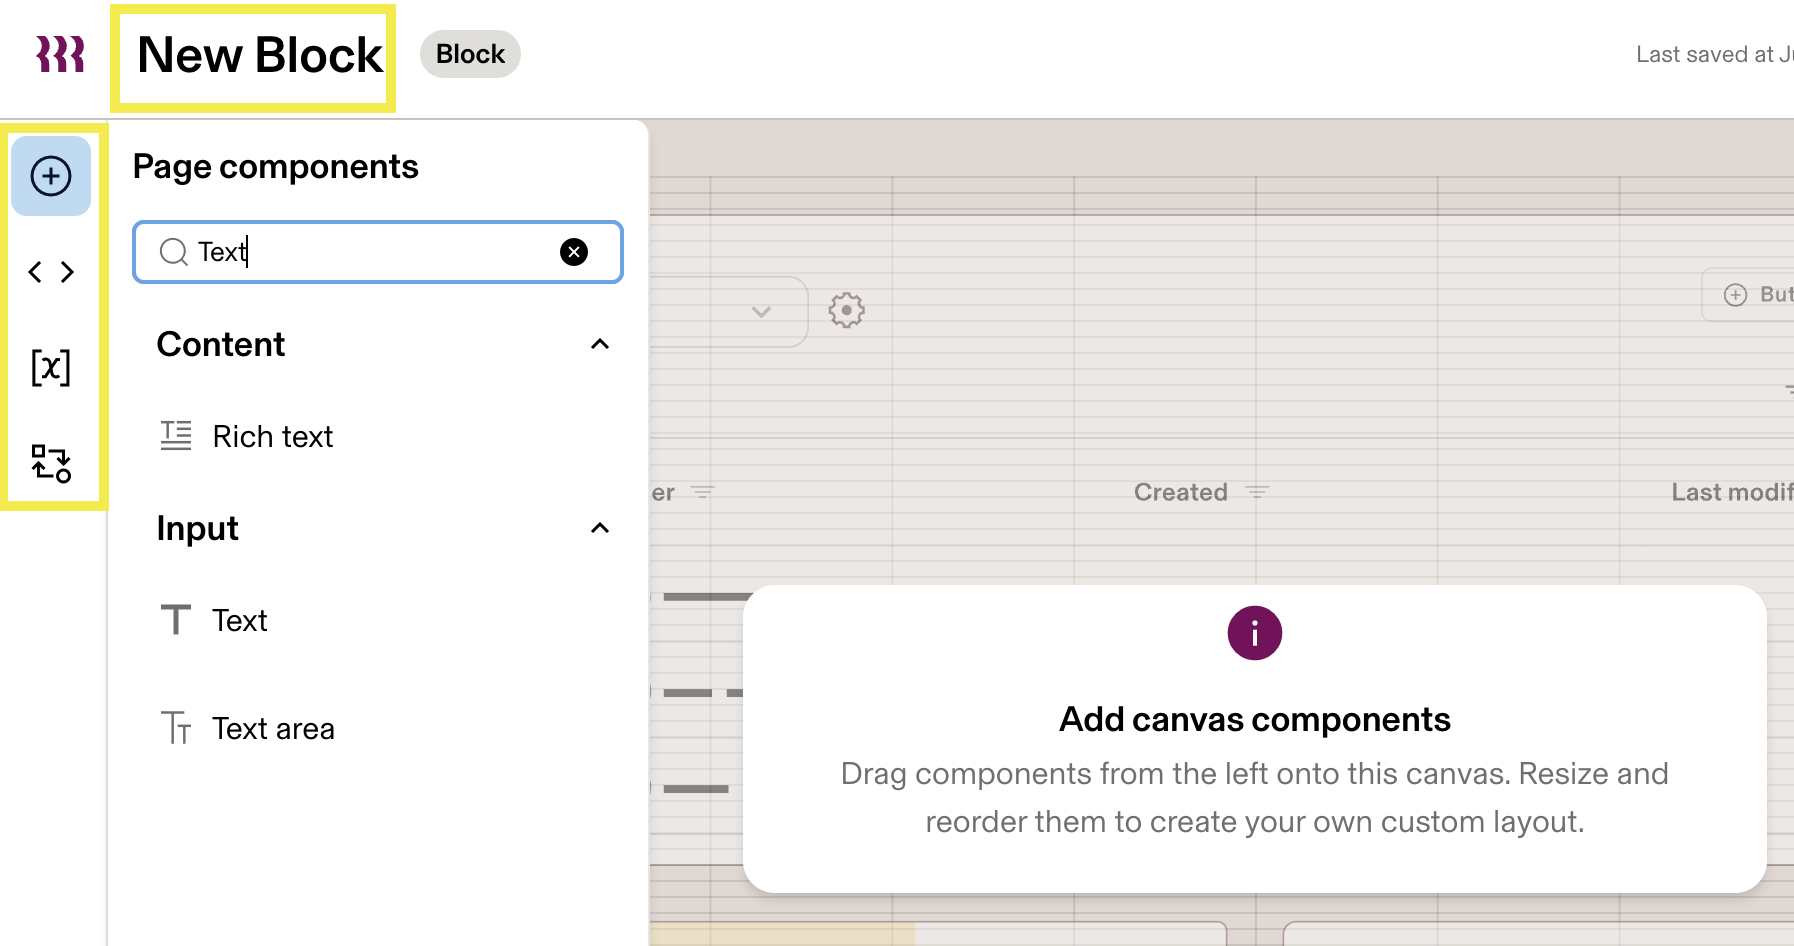
- From here, build a block using any of the available components. This example uses a Text component. Learn more about the available components in Get started with custom apps.
- Give the block a name by clicking on the name in the top left corner and entering your desired text.
- When you’re done building the block, click Done in the top right corner to close the app editor. The block will be added to the bottom of the list on the Block Manager tab.
Define a block input variable
To render employee-specific data, your block needs to know which employee it’s displaying. This is done using a block input variable.
- Click the pencil icon (Edit block) next to the newly-created block.
- Click the
xicon (Add variable) from the left-hand navigation panel. - Select +Add variable > Block Input.
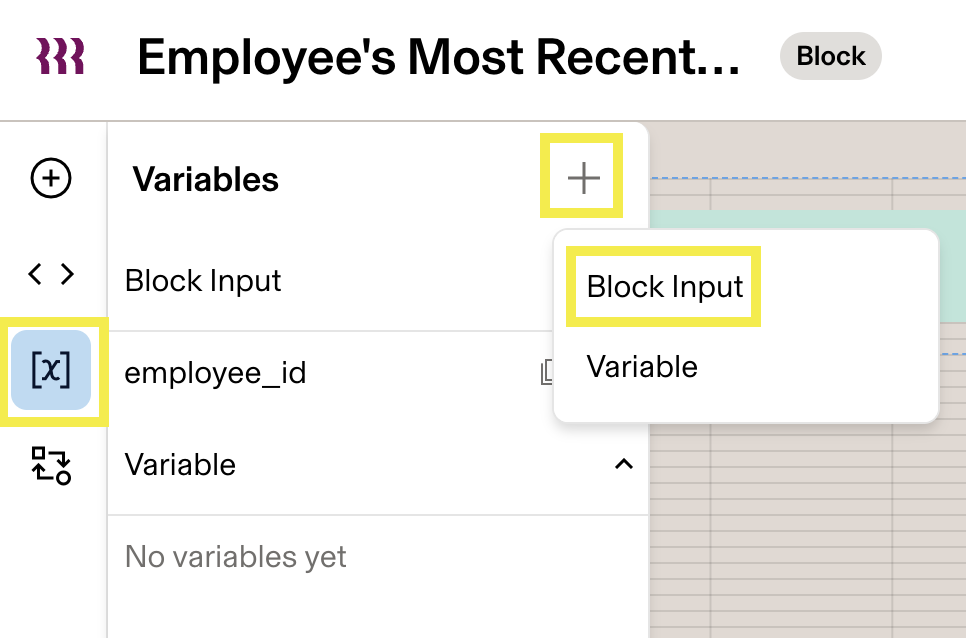
- Specify the Input name as
employee_id, with an optional description.
Now when the block is rendered inside the employee profile page, that page will pass the current employee’s ID into this variable. For more on how variables work in App Studio, see Get started with custom apps.
Call a function within the block input
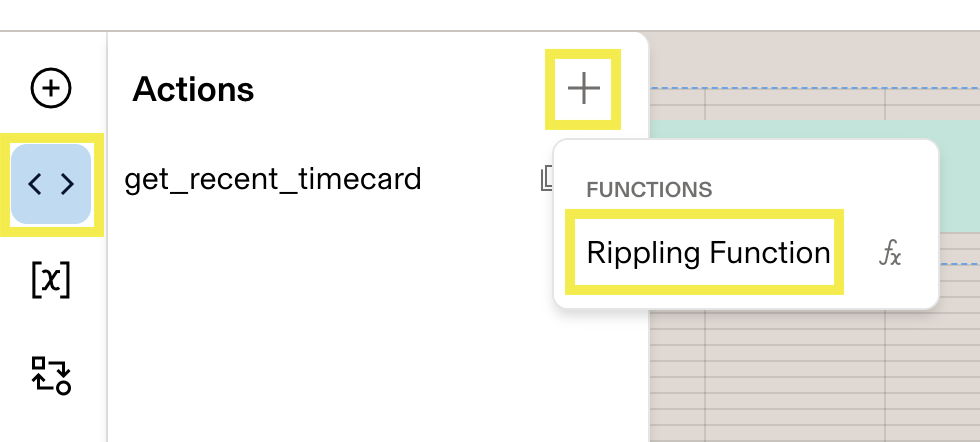
Connect a Rippling function to the block by adding an action. Each action represents a function the block can run, for example, when the block loads or when a user triggers something on the canvas.
- Select < > (Add action) > + > Rippling Function from the left-hand navigation panel.
- Enter an Action name and select your deployed function (for example,
get_recent_timecard) from the Function dropdown. See Get started with functions if you haven't created one yet.
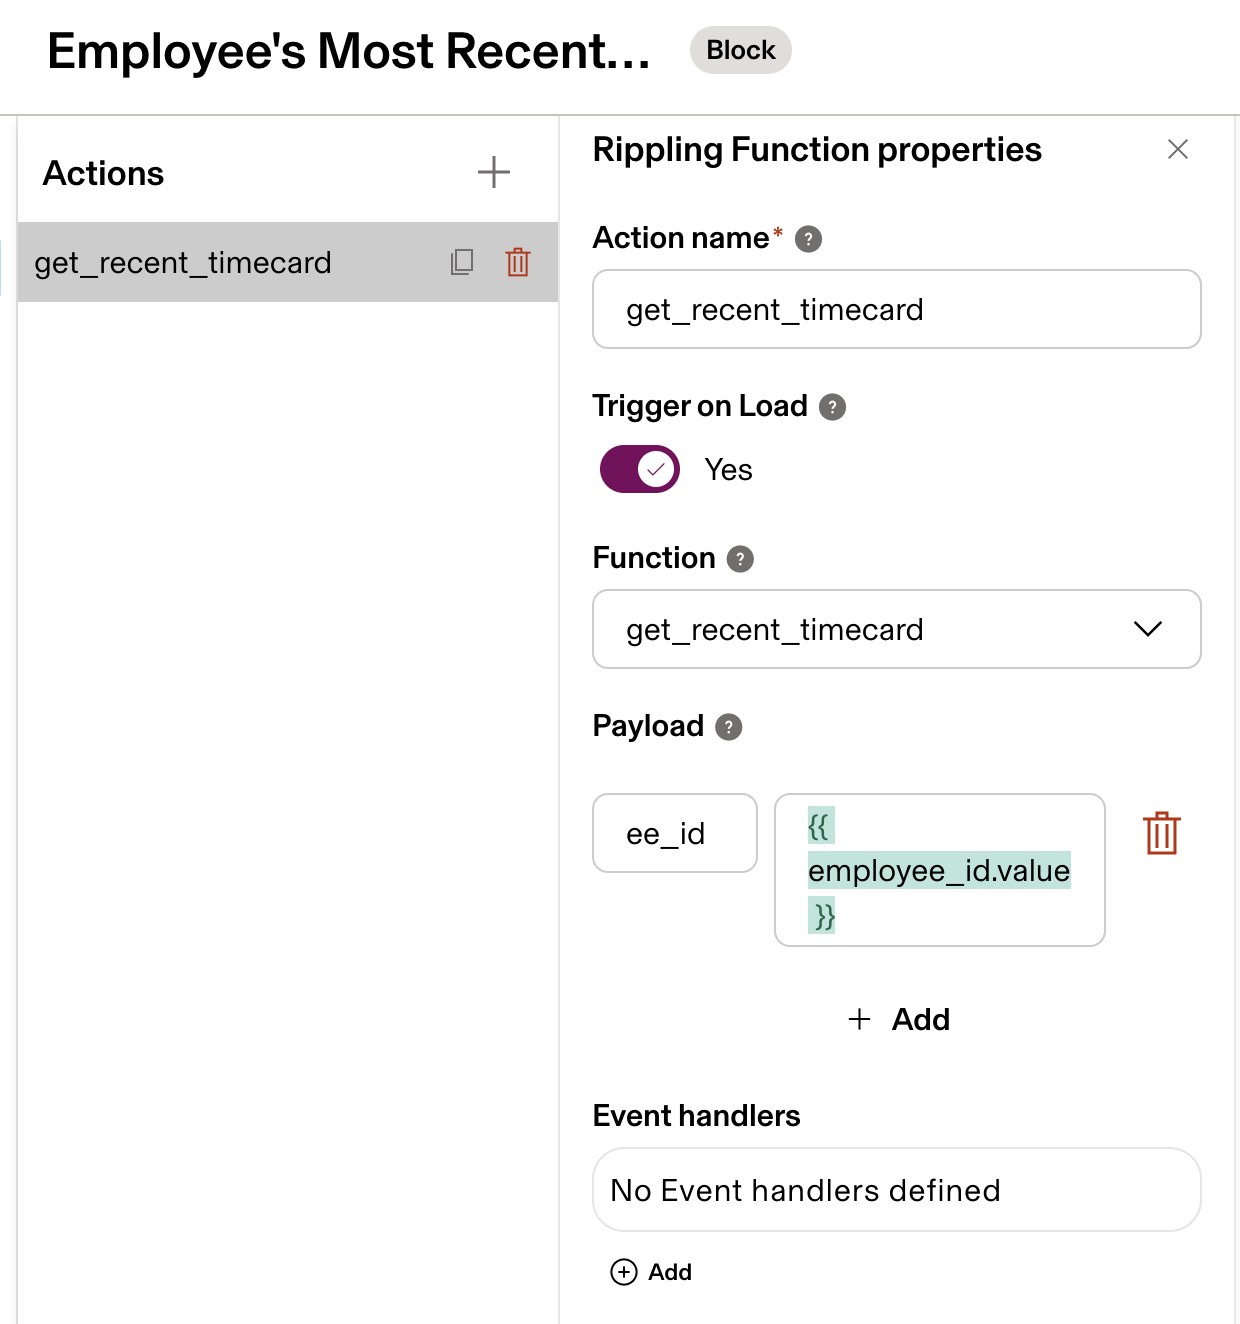
- In the Payload field, reference the block input variable using template syntax:
{
  "ee_id": "{{ employee_id.value }}"
}
When the block triggers upon page load, the employee profile page passes employee_id to the block, which automatically calls get_recent_timecard and returns timecard data for that employee.
For more information, see Invoking functions and Adding interactivity to components with event handlers.
Bind the function result to the UI
Now render the result inside your block.
- Click out of your new action, select +Add component from the left-hand sidebar, and search for the type of component you want to display upon page load (for example, Notice). See Get started with custom apps for more details on available components.
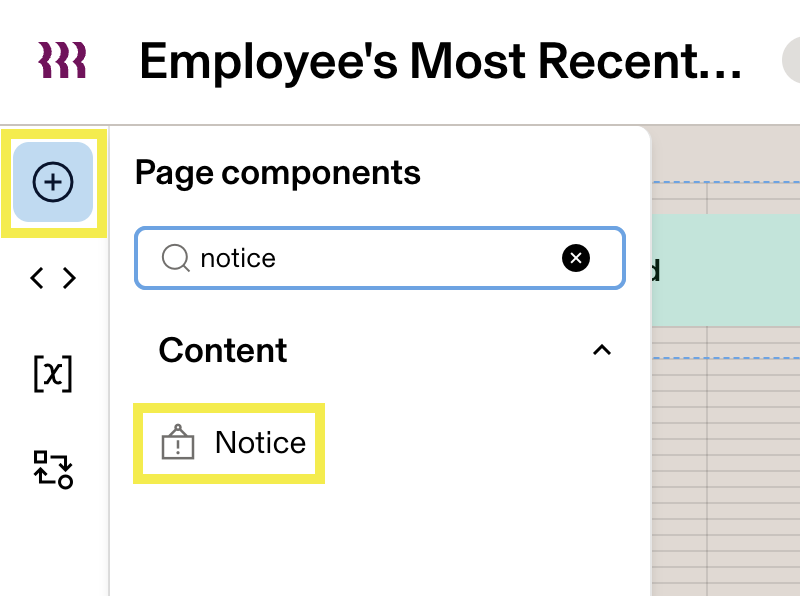
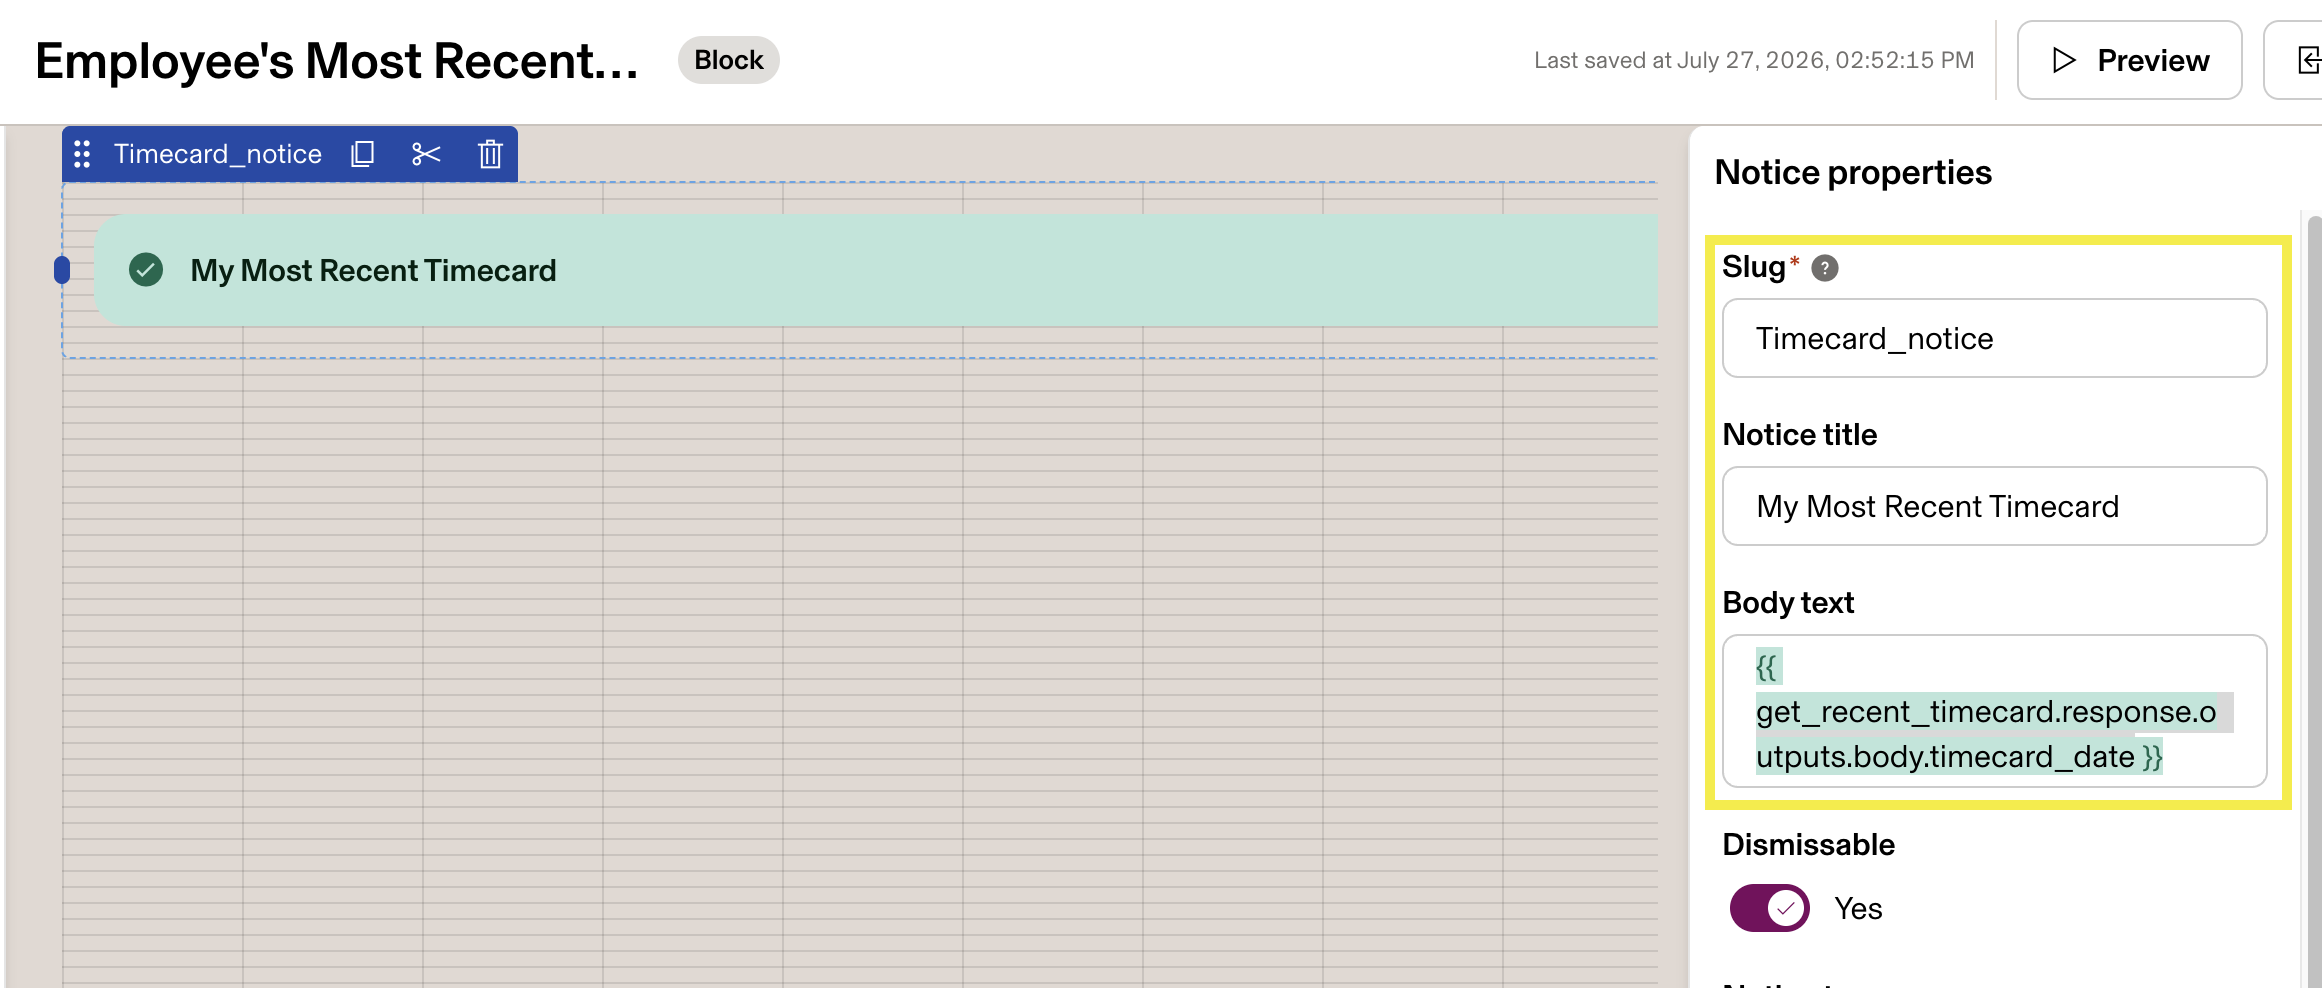
- Select the component, drag and drop it to the canvas, and click the component so the Notice properties panel opens on the right-hand side.
- In the field that should show dynamic data (for example, the text body), bind to your action’s response using the
{{ }}template style. The path usually follows{{ your_action_name.response.field }}for the data your function returns.
Example for a Notice component showing a date from get_recent_timecard:
| Field | Value |
|---|---|
| Slug | Timecard_notice |
| Notice title | "My Most Recent Timecard" |
| Body text | {{ get_recent_timecard.response.outputs.body.timecard_date }} |
Now when the block loads:
- The function runs.
- The response is returned.
- The UI updates dynamically.
Test the block
Before embedding it, test the block directly in App Studio.
- While your block is selected, click Preview.
- Provide a value for
employee_id. - Click Test.
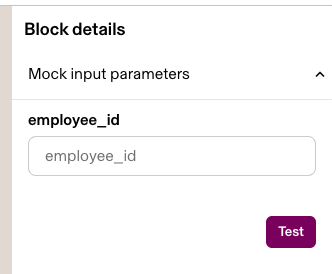
This simulates how the block will behave when embedded in a real profile page. Click Done after you've finished editing and testing the block.
Configure access to the block
Next, configure who has access to manage, use, or view the block you just created.
- Navigate to Tools > App Studio > Block Manager. Click Manage access to the right of your block.
- Add people to the below groups to assign access.
- Click Save.
| Group | Permissions |
|---|---|
| Manager | Managers will be able to edit or delete the block in App Studio and manage who else has access to the block. |
| Operator | Operators will be able to embed the block elsewhere. |
| Viewer | Viewers will be able to see the block once it’s been embedded. |
Access is cumulative; Managers have all Operator/Viewer permissions, and Operators have all Viewer permissions.
Embed the block in the employee profile page
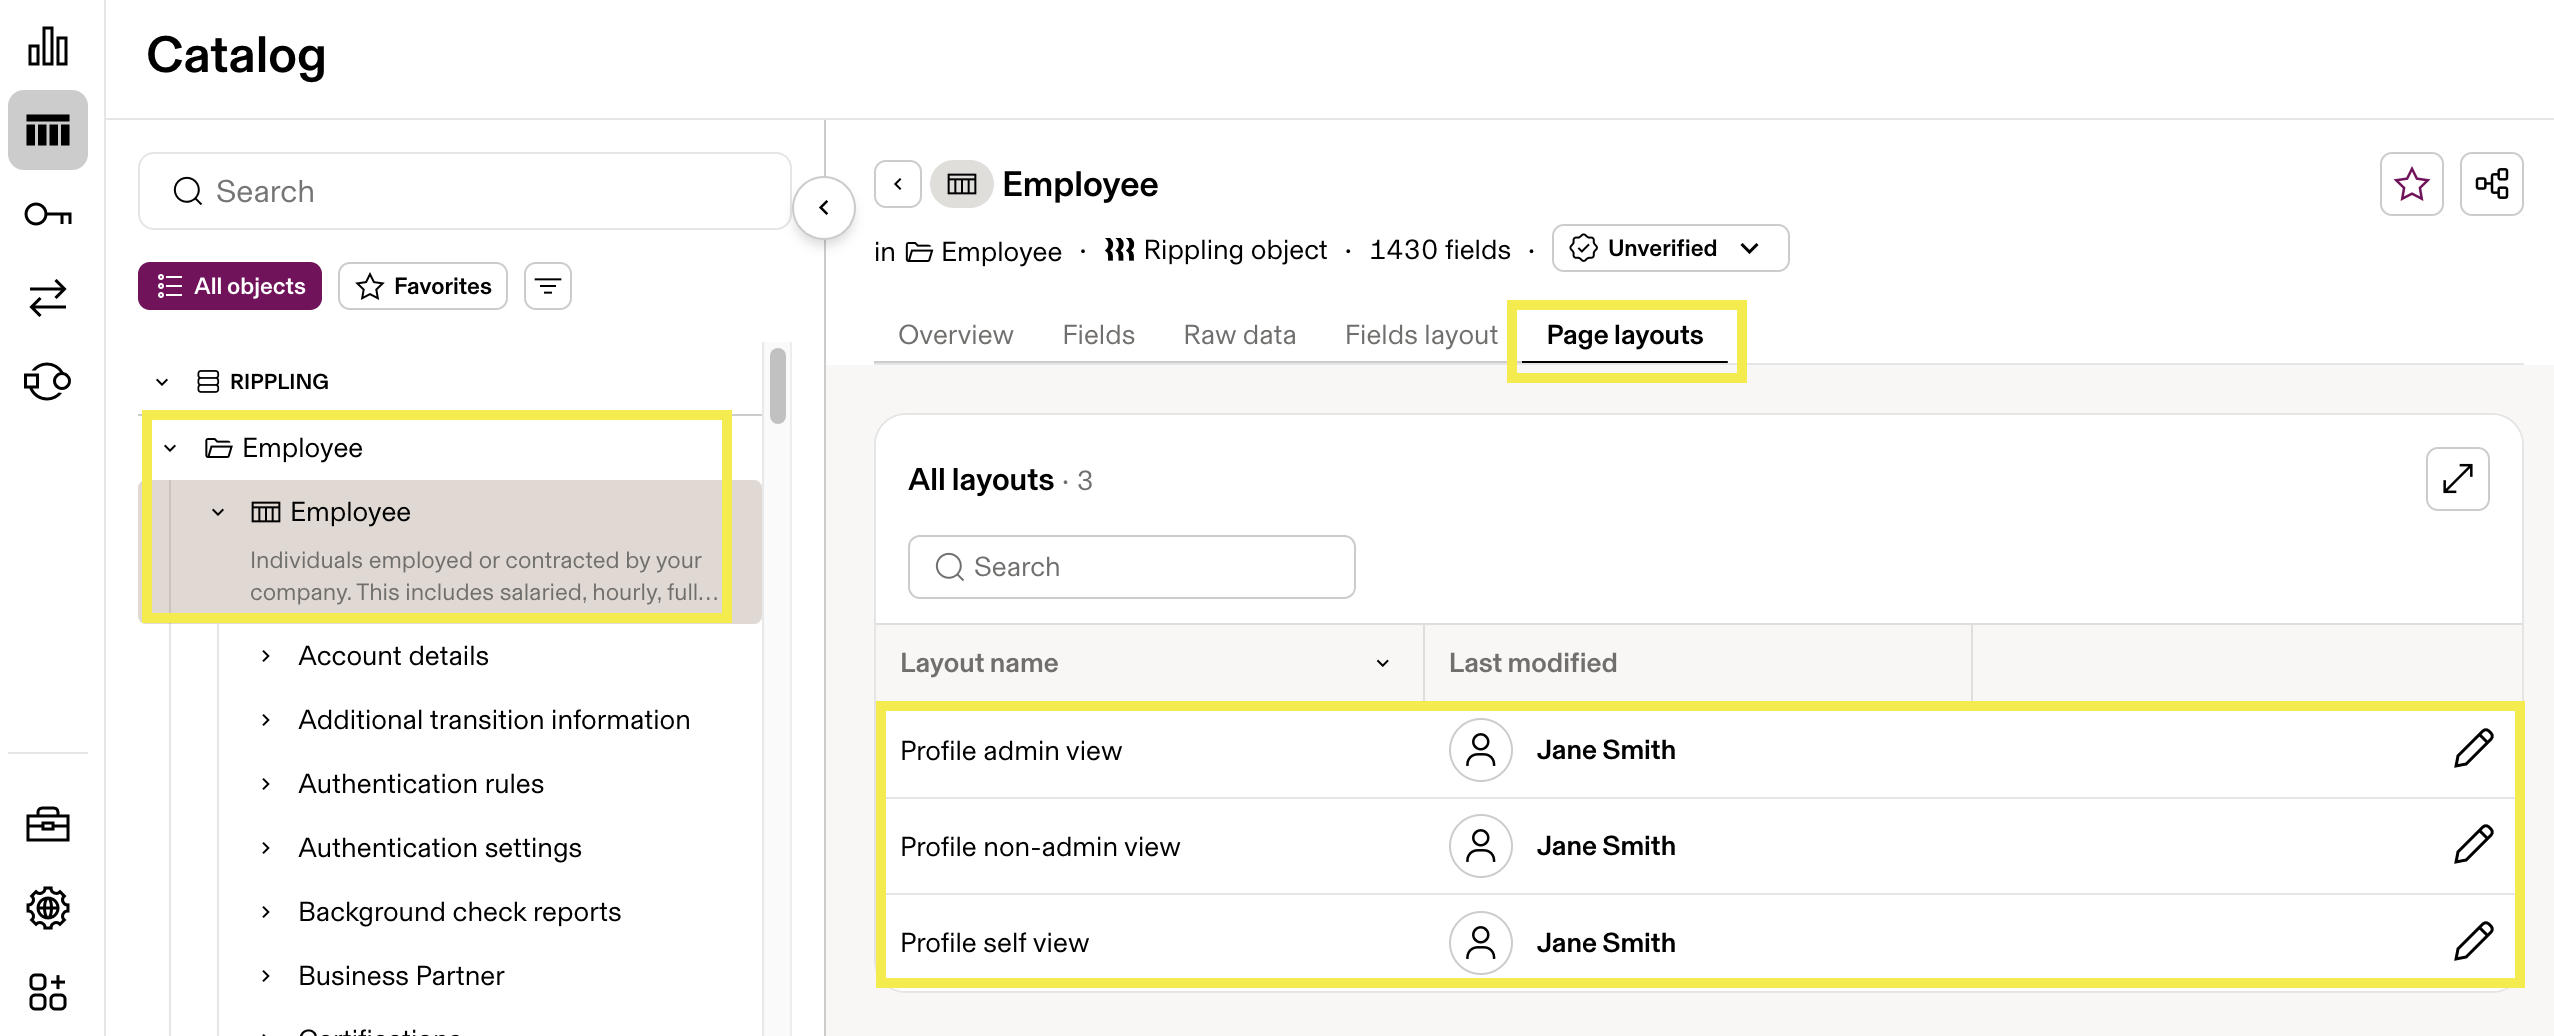
- From the sidebar in Rippling, select Data > Catalog.
- Select the Employee category > Employee object.
- Select the Page layouts tab.
- Click the pencil icon associated with the employee profile layout you want to edit. There are three unique profile layouts you can configure: Profile admin view, Profile non-admin view, and Profile self view. Learn more in Overview of Rippling user profile pages.
- Select the tab on the employee profile page where you want to embed the block, for example, Role information.
- Click +Add block.
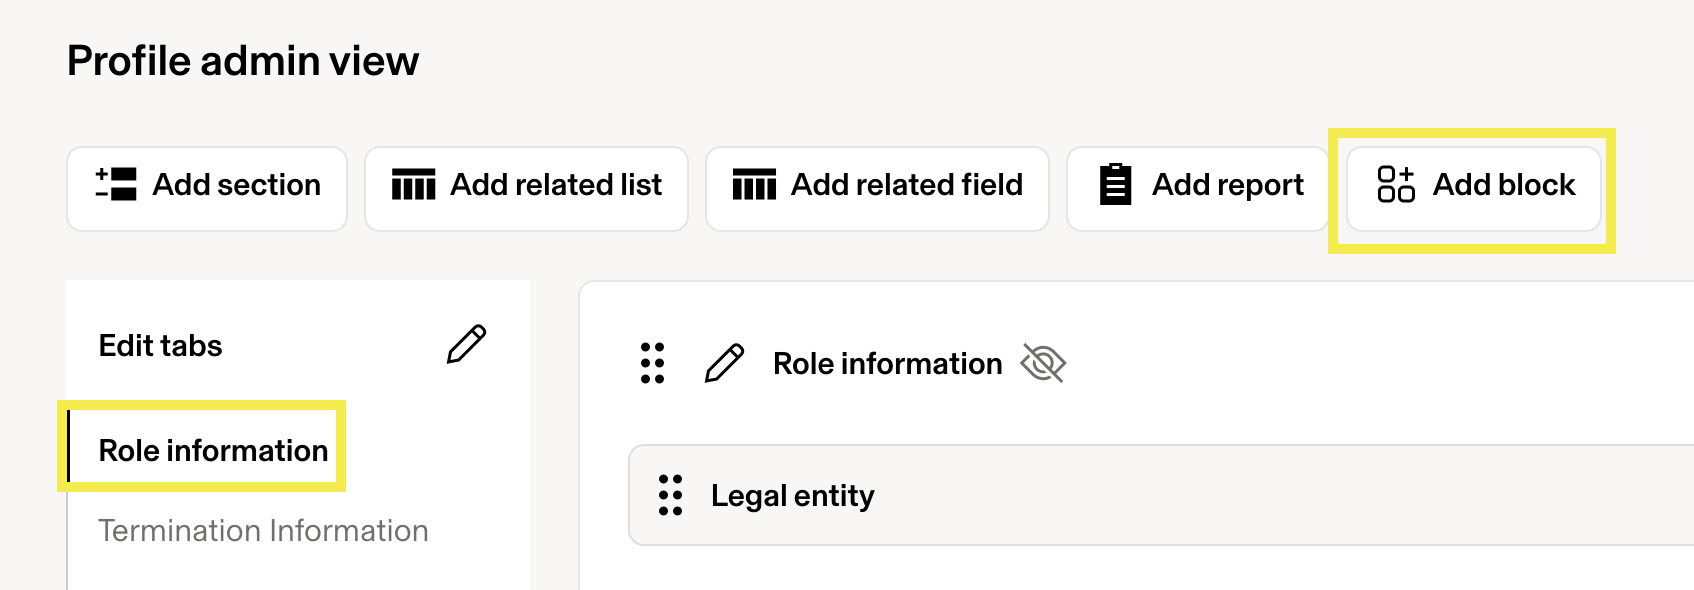
- Select the block you want to embed, then click Add to page. The block will be added as a new section at the bottom of the page.
- Click the pencil icon and name the new block (e.g., "Employee's Most Recent Timecard").
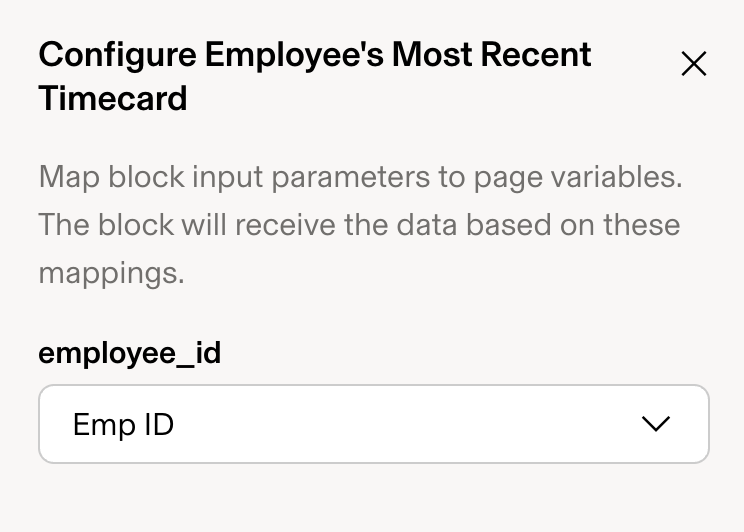
- Click the Configure button to map block input variables to page variables and click Save once finished.
You’ll see a mapping interface showing the required block parameters and the available parent page variables. If the names match, mapping happens automatically. If not, manually map the parent page variable to your block input.
- Click Save at the top of the page. To reposition the block, drag it using the four-dot icon.
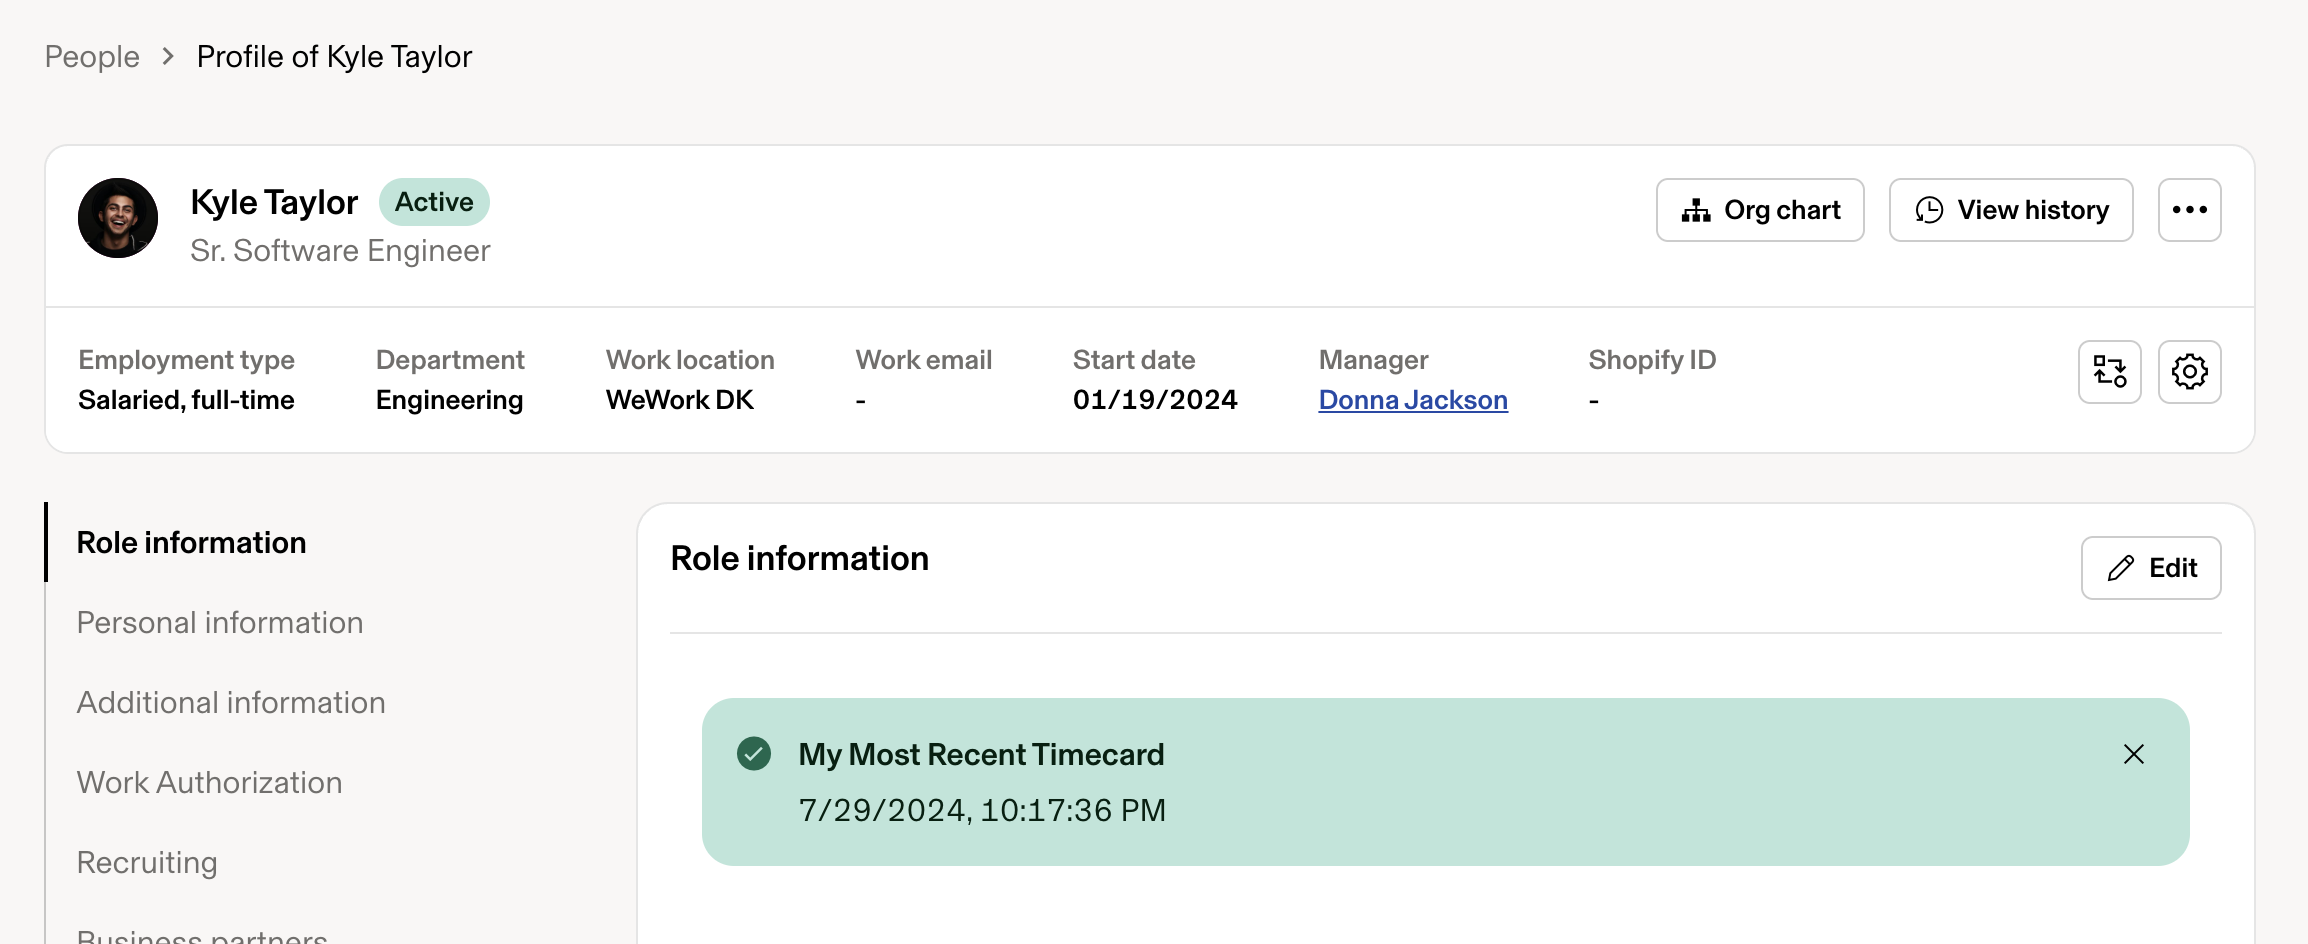
- Navigate to an employee profile and refresh the page. The block will now display dynamically based on the employee being viewed.
Update data
Here’s an example of the high-level flow to update a custom object field from a content block embedded in an employee’s profile:

How does this differ from displaying content with Block Manager?
| Timecard (read) | Sweatshirt size (write) | |
|---|---|---|
| Trigger | On load | Button click |
| Payload | employee_id | employee_id + user input |
| Function | Fetch and return data | Upsert custom object |
| UI | Bind response into Notice/Text | Input + save; optional success message |
| Verify | Data renders in block | Record updated in custom object |
Create the custom object and field
- From the sidebar, select Data > Catalog.
- Click +New object.
- Enter the Object name (e.g., "Employee Swag"), an optional description, and select how you would like to create this object (“I’ll create it manually” for this example). Note the object’s API name.
- Click Add field to add a text field for the value users will enter:
- Field name: "Sweatshirt size"
- Note the Field API name, which is unable to be modified.
- Field type: Basic field
- Data type: Text
- Add to page layouts: All layouts
- Click Add field to now add an additional lookup field to the Employee/Role object.
- Field name: "Role"
- Field type: Lookup field
- Enable parent-child relationship: Disabled
- Lookup Object: Employee
- Related data label: "Employee Swags (Role)"
A lookup field links each Employee Swag record to one employee. Without it, the size exists on the custom object but isn’t tied to a person, so profile-related lists can’t show “this employee’s sweatshirt size.”
Create and deploy the update function
Create a function (example: update_sweatshirt_size) that:
- Reads
employee_idandsweatshirt_sizefromevent.parametersorevent.inputs. - Uses your V2 API key from function settings (example:
api_key_v2). - Upserts a custom object record on
rest.ripplingapis.com:- Look up by
external_id = employee/role id - If found, PATCH; if not, POST
- Body includes name,
external_id, sweatshirt size field, and the Role/Employee lookup
- Look up by
Ensure the API key has custom-object-records read-write (and related custom-objects scopes) and deploy the function before wiring the block.
For more information on functions, see Get started with functions.
Create the block
- From the sidebar, select Tools > App Studio > Block Manager > Create block. Give the block a name (e.g., "Sweatshirt Size").
- Add a block input variable:
- Select Add variable > +Add variable > Block Input.
- Input name:
employee_id - Optional description: “Current employee/role id from the profile page”
- Add a new action:
- Click Add action.
- Action name:
sweatshirt_size - Function:
update_sweatshirt_size - In the Payload field, reference the block input variable and user input using template syntax:
  {
    "employee_id": "{{ employee_id.value }}",
    "sweatshirt_size": "{{ sweatshirt_size_input.value }}"
  }
- Add a Text area component:
- Click +Add component.
- Title: "Sweatshirt size"
- Default value: "Enter size"
- Placeholder: "Enter size"
- Add a Button component:
- Click +Add component.
- Label: "Save Changes"
- Appearance: Primary
- Event handlers: Event: Click event; Type: Control Action; Action:
sweatshirt_size; Trigger: Method
- Click Preview or Done when finished.
Configure access to the block
- Select Tools > App Studio > Block Manager.
- Click Manage access to the right of your block.
- Add people to the appropriate groups and click Save.
Embed the block on the employee profile
- Navigate to Data > Catalog > Employee > Employee > Page layouts.
- Edit the layout you want (Profile admin view, Profile non-admin view, or Profile self view).
- Click Add section and add a new section called "Sweatshirt size".
- Add your block to this section by clicking +Add block, selecting your block, then clicking Add to page.
Add display section in the employee profile
- In the same page layout editor, choose a tab (e.g., "Personal information").
- Click Add related list and search “Employee Swag: Role” (or the custom object name created in step 1).
- Add Name and Sweatshirt size to be included in the list that will display on the employee profile.
- Drag the list to the top of the page and click Save.
- Open an employee profile, refresh, enter a size on the Sweatshirt size tab, click Save, and verify the new record under the Personal information > Employee Swags (Role) section.
You can also view these records in the Data > Employee Swag > Records tab.
Best practices
- Always use block inputs for contextual data.
- Never hardcode identifiers.
- Handle empty and error states gracefully.
- Avoid unnecessary API calls on render.
- Test blocks independently before embedding.
FAQs
Why isn't my block displaying?
Confirm the block is added in the page editor, then click Save & exit and hard-refresh the page.
Why is employee_id undefined?
When you created the variable, you may have selected Block Input as the type; you can't change an existing variable after creation. Confirm the variable is named employee_id and re-check the mapping step when embedding the block.
Why is my function returning no results?
Test the block directly with a valid employee_id and confirm the function works independently. You can also add a fallback in your UI:
{{ get_recent_timecard.response.date || "No timecards found." }}
Why does the block work in testing but not on the page?
This is almost always a mapping issue. Reopen the page editor, confirm employee_id is mapped, then save and refresh.